Welcome! This is page 3 of my COMMISSIONED PET PORTRAITS TOUR. This page shows the multiple steps in the formation of a few of my watercolor portraits. My slow and patient technique of layering of the paint produces a spectacular result! Hopefully it shows you why my art is worth what I charge. If you want to order a gorgeous work of art featuring your own dog, cat, or horse, see PAGE 1. To see less expensive prints & originals, go to my HOME PAGE ».
PLEASE READ THIS BEFORE YOU GO FURTHER: Please do not copy stuff from my website - do not copy for your Facebook use, for Pinterest use, or for any other personal, social, or business use, without my written permission. When portions of my website are taken out of context and published elsewhere, it doesn't promote my artwork like I need it to. If you have questions about copyright law, please look it up.
These pages contain decades' worth of my own original works, which I made from scratch, from the bottom up-- which means I invested a tremendous amount of my time and my own money in my education, camera equipment, materials, supplies, professional fees, giving of donations, travel, fees for booth space at art shows, and so on. There are a lot of hidden expenses associated with producing nice art, and a lot of labor and expense (which I didn't get paid for) in developing this website. Also, the people whose pets I am showing here deserve respect, and that means you do not have a right to use a picture or painting of their pet for your own purposes. They would prefer that the artwork I present here remain within the context of this website.
Thank you very much for your understanding!
Watch the steps below showing the formation of fabulous watercolor paintings and pet portraits by Janet L. Wissmann. Sometimes people incorrectly enter my name into search engines as J. Wisemann or Janet Wiseman or Janet Weissman or Weissmann --hopefully you will finally end up here on this page or one of the other pages of my website... and will still be able to find my artwork and contact information on this website :)
Progression of a transparent ________ PAGE _ 1 _2 _3 _4 _NEXT »
watercolor dog portrait
Bosco -German Shorthaired Pointer

A lot of work goes into one of my original watercolor portraits. I paint all my paintings
by hand, with brush and
paints and skill. I do
not use computers to do my watercolor portraits and paintings. I do not use photoshop.

There are many, many layers of paint in a finished Janet Wissmann painting. This adds depth and richness to the artwork, making it come alive.


Here's the photo that was used for the German Wirehaired Pointer watercolor portrait.
The following closeup views of the German Shorthaired Pointer painting show how transparent watercolor is layered. The first few layers are dilute washes of paint. These layers provide a foundation of color and form. All this requires a good deal of skill, as well as a certain way of seeing things that is different from the way an artist using opaque oil or acrylic sees things. With opaque paints, the artist often applies the darker colors first, then lighter paints on top, finishing with whitish highlights. Transparent watercolors need to be tackled in the reverse manner, and it requires a particular way of thinking.


Like any other part of a transparent watercolor painting, the eyes will require several layers of paint to look their best. Despite the fact that I have painted over 600 animals, I still find it a relief when they turned out as planned!


BELOW: You can see in this series of four images that the painting becomes more three-dimensional as more layers of paint are added. At the same time, some areas of the painting are intentionally left lighter, i.e., with fewer layers of paint. There is no white paint used here, only "negative painting" where the watercolorist avoids adding paint to an area to keep it light, allowing the white of the underlying watercolor paper to show. Click each of these pictures to enlarge.


Next page shows several client testimonials
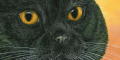
How do you paint a black dog such as a black labrador using transparent watercolors? Or a black cat? Try this method:
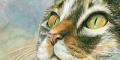
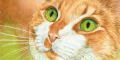
Progression of a Watercolor Cat Portrait
Niles - American Shorthair Cat


The following three pictures really show
the way watercolor is layered -- Click on each one!


There is nothing like an Original...
In a transparent watercolor painting, the white of the 100% cotton watercolor paper shows through all but the very darkest of the layers of paint. The above scanned images appear a little washed out or overly bright (compared to the original painting) because the bright lights of the scanner bounced off the white watercolor paper surface behind the transparent paint.
Click on the picture directly above this paragraph.
Then click on the picture directly below.
The picture below shows the quality of the original watercolor painting a bit better; it's taken with a digital camera under natural light, and under these conditions you can see that the colors are richer and fuller. Yet neither method can really show the quality and richness of an actual original painting . . .
There truly is nothing like an Original!

Click on images to see fine detail.

When you click on the picture below, you can see the sharp edges of each paint stroke which happen when the watercolor dries and the tiny particles of paint move to the edges as the water dries. This subtle gradation of pigment is what makes each hand-painted watercolor a unique work of art, and it adds to the beauty of an original.

"How long did it take you to paint that?"
By now you've seen that creating a transparent watercolor painting takes more effort than simply painting a few brushstrokes on paper. It takes initiative, and a good amount of natural talent. It takes a particular way of viewing things. It also helps to take some painting classes and read lots of painting books. And it takes lots and lots of practice.
One of the preliminary steps in watercolor painting is that of paper stretching. Actually, the paper isn't really stretched. The single sheet is soaked for a few minutes in water so that its fibers can expand, then the paper is taped, wet, onto a board where it will dry and become taught. This is done so that the paper won't buckle later when the watercolor paints are applied.
 Janet writes,
"Here's a photo that shows a painting in progress, still taped to its board (click on it to enlarge it). You can also see the conditions under which I paint: nothing all that fancy, really. That's one of the nicest things about transparent watercolor."
So, are you impressed yet? You should be. When people ask Janet how long it takes to do a painting, after adding in the years of training and practice, she can honestly tell them, "Oh, about fifty years."


These reference photos were provided by Niles' owner.
 -
- -
- -
-
 -
- -
- -
-
$24 ea. postpaid. Just call to purchase, or buy one with paypal/credit card here »
__________________________________________________________________
Janet L. Wissmann, Watercolorist
Soldiers Grove, Wisconsin __ph. (608)624-5511 _9am-9pm Central Time Zone
__________________________________________________________________
Soldiers Grove, Wisconsin __ph. (608)624-5511 _9am-9pm Central Time Zone
__________________________________________________________________
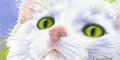
How do you paint a white dog or a white cat - How is white fur painted? If you would like to see my helpful tips, My instructions on how to paint a cat are available on this page.
Progression of a transparent watercolor portrait
Figgie -Golden Retriever

Janet Wissmann's watercolor portraits are usually begun by using light washes of paint. As more and more layers of paint are added, the painting begins to take on a depth and glow that can only be achieved by her slow and patient method of painting.
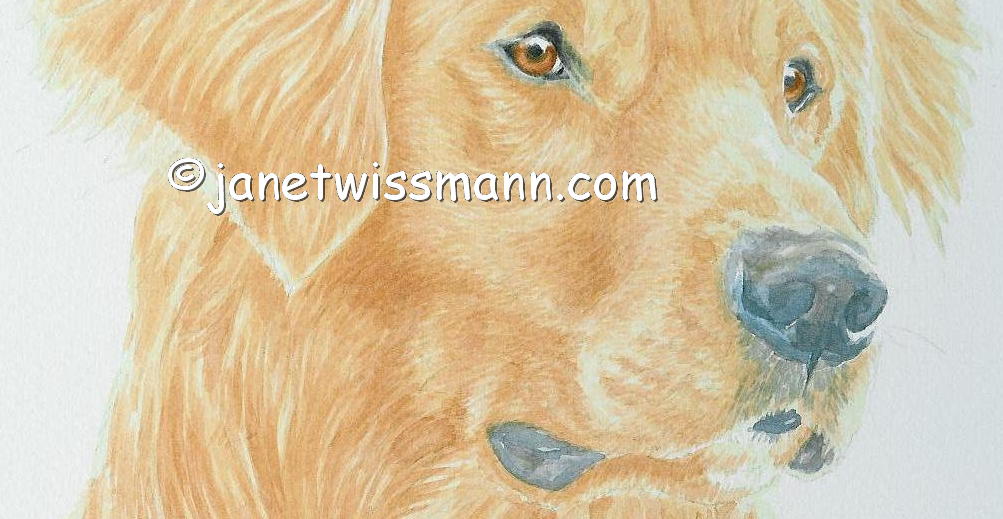


Click the picture above to enlarge it. Note the layers of paint and the negative painting that defines the texture and color of the fur. There is no white paint in this painting except for the highlight in the eye! The lighter areas simply have less paint applied. Janet says, "When I'm painting like this, I need to be thinking both positively and negatively at the same time: I'm painting around areas to be left light and, at the same time, I'm painting over areas that need to be darker."
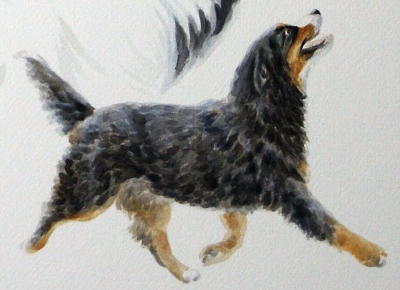
Details of a painting of a black-and-white dog
Zasu -Border Collie

When Janet paints black-and-white dogs like Zasu, she actually use some blues and browns to help make the black more interesting.
 Just as when a white dog isn't really pure white due to reflections of light, a black dog isn't pure black either. You may see some of the blues and browns if you look carefully at the nose. Click on upper image to enlarge.
How to commission a painting »

Border collie art, watercolor painting of Border Collie, commissioned Border Collie painting portrait, dog watercolour portraits, dog watercolor paintings, pet portraits in watercolor, pet watercolour portraits by Janet Wissmann
Anatomy of a Bird Portrait Commission
An In-Depth Study of a Watercolor Painting
 Janet writes,
"Being a watercolorist who often paints furry animals, I am always delighted to have a chance to use some of the brighter colors on the palette when it comes to painting the psittacines many people keep as pets. The Yellow-fronted Amazon at left required the use of sap green, Hooker's green, and cadmium yellow, while the Scarlet Macaw gave me some experience with cadmium red and alizarin crimson.
"It is not only vibrant color that provides a change of pace when painting birds. The shape, texture, and placement of feathers also present nice diversions. Yet painting birds is not without its challenges! On a healthy, well-groomed bird, the feathers interlock and overlap to form a perfectly smooth and aerodynamic flying machine. Feathers do not just occur randomly on a bird; they grow in tracts, with each part of a bird's body growing feathers of a specific contour and size. Even the location of the midvein of a feather is very specific to the feather's location. (For example, the midvein of a bird's primary wing feather is distinctly offset from the center line. Any bird enthusiast should be able to look at a given flight feather and identify which wing it came from.)
"In order to show all the colors of this magnificent
 Scarlet Macaw, I decided to paint him from the back. The foreshortening of the wing feathers added a bit of drama to the composition, and the tipping of his head allowed his face to be shown as well. By painting him in this pose, I got my chance to use just about all the colors in the rainbow. Colors here included cadmium red, alizarin crimson, sap green, Hooker's green, cerulean blue and ultramarine blue. There's a touch of cad yellow in there too.
 "The Blue and Gold Macaw's pose came about out of necessity. This bird is a feather-plucker! As many pet bird owners know, some pet birds develop a behavior disorder where they pick out their own feathers, a disorder they often have for their whole lives. This macaw's entire breast was bare of feathers! So, in order to show his "best side", I had to paint him from the back; the other option would have been to paint in those missing front feathers. But if I had done that, would the owner have recognized her own bird? Possibly not!
"And then there was the silly
 African Gray Parrot. Yes, it was pretty much back to mundane grays and blue-grays for this one. But this bird made up for it by being a real character. It turns out that one of his favorite things was to hold an ice cube in his foot. We have no idea why he enjoyed it, but it did serve to give his humans a source of constant amusement. So this is the way I portrayed him in the painting.
 "While the painting was still in the compositional stage, the owner added one more bird to her flock. She sent me a photo of the fledgling's profile, so I added it at the bottom of the painting. I think the final composition turned out quite nicely."
Click the picture at left to enlarge it.
Next page shows several client testimonials
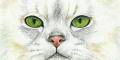
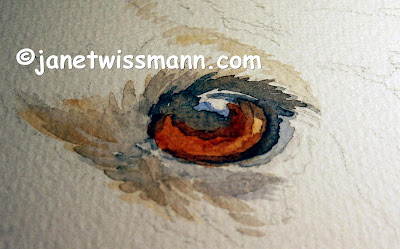
Painting Dogs' Eyes in Watercolor
Dogs have different shapes of eyes, depending on the breed. There is also some variation within a breed.
.jpg)
.jpg)
.jpg)
.jpg)
.jpg)
.jpg)
.jpg)
.jpg)
.jpg)
.jpg)
.jpg)

.jpg)
.jpg)
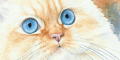
If you are a student of painting and you wish to paint dogs' eyes well, you might consider purchasing one of the many dog ORIGINAL paintings Janet offers for sale on her ORIGINAL Dog Paintings Gallery» _For about the price of a good watercolor painting book, you can have your own original watercolor painting to study! Or, if you are interested in the eyes of other animals, you will probably want to buy one of Janet's BRIGHT EYES CATS PRINTS, here >
Painting Dog Eyes - Maggie
You may be thinking of commissioning Janet to paint your dog. Here is a good reason to do just that! Below are a few closeups of a recently commissioned portrait. Janet paints eyes beautifully, and the sienna-colored eyes of Maggie are no exception. Janet expertly applies the layers of watercolor in a crisp and brilliant manner, and the results are excellent clarity and depth in the dog's eyes.
.jpg)
Note that there is no white paint in this painting. Janet has loyally followed the tradition of transparent watercolor, painting Maggie so that all the light areas--including the highlights in her eyes--are due only to the white of the paper showing through the paint layers.
.JPG)
.JPG)
.JPG)
The photos above and below perfectly show the granulation and the layering of the paint. Click on each of them to enlarge.
 Click photo to enlarge. Here you will see how Janet layers the transparent watercolor in as many as twenty layers of paint. There is no white paint in this painting; it's always the white of the paper showing through the transparent medium. Be sure to click on the image to make it larger; you will see these initial layers of paint very clearly, and you will see the granulation of the paint at an almost microscopic level. You will also see the minimal amount of pencil marks that Janet made in the preliminary drawing stage.
Learn more about commissioning your own painting »
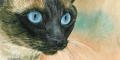
Here's how to paint animals' eyes with watercolor paint. How to paint cat eyes. How to paint dogs' eyes with watercolor, by Janet L. Wissmann.
Dogs have different shapes of eyes, depending on the breed. There is also some variation within a breed.


If you are a student of painting and you wish to paint dogs' eyes well, you might consider purchasing one of the many dog ORIGINAL paintings Janet offers for sale on her ORIGINAL Dog Paintings Gallery» _For about the price of a good watercolor painting book, you can have your own original watercolor painting to study! Or, if you are interested in the eyes of other animals, you will probably want to buy one of Janet's BRIGHT EYES CATS PRINTS, here >
Painting Dog Eyes - Maggie
You may be thinking of commissioning Janet to paint your dog. Here is a good reason to do just that! Below are a few closeups of a recently commissioned portrait. Janet paints eyes beautifully, and the sienna-colored eyes of Maggie are no exception. Janet expertly applies the layers of watercolor in a crisp and brilliant manner, and the results are excellent clarity and depth in the dog's eyes.

Note that there is no white paint in this painting. Janet has loyally followed the tradition of transparent watercolor, painting Maggie so that all the light areas--including the highlights in her eyes--are due only to the white of the paper showing through the paint layers.


The photos above and below perfectly show the granulation and the layering of the paint. Click on each of them to enlarge.
Learn more about commissioning your own painting »
Next page shows several client testimonials
Here's how to paint animals' eyes with watercolor paint. How to paint cat eyes. How to paint dogs' eyes with watercolor, by Janet L. Wissmann.
Progression of a transparent watercolor portrait
Topper -Bernese Mountain Dog

Click any picture to enlarge.

See all my Bernese Mountain Dog Art HERE »»
Below: the finished painting

Unpainted watercolor paper has a wonderful texture and brightness, and is a beautiful background for a painting like this. Unlike paintings using other media, watercolors don't need to have every inch of the substrate covered with paint.
Janet intentionally left the running-dog portion of the painting lighter and less detailed than the main head study.
See more Bernese Mountain Dog Art HERE »»

Janet writes,
"I used no white paint in this painting; any white you see is the unpainted surface of the watercolor paper. I love painting dogs that have their mouths open; the tongue, teeth, and gums have textures and shapes that are different than the fur-covered parts of an animal. Such variety adds interest to the painting."

Photos used for painting of Topper -Bernese Mountain Dog


Topper is a remarkable obedience dog who prances in a very Berner-like fashion while running alongside his owner. The client chose these two poses from amongst the seventy photos of the dog which Janet had taken at a dog show.
See all my Bernese Mountain Dog Art HERE »»
MORE ABOUT THE ART OF WATERCOLOR
 A LIMITED PALETTE OF COLORS
My palette for painting most animals consists of only about six rather plain colors—
 payne's gray, ivory black, burnt sienna, yellow ochre, cerulean blue, ultramarine blue—and an occasional hint of red or sap green. Using these modest colors, I can do almost anything necessary to make an animal portrait come alive.
THINKING POSITIVELY AND NEGATIVELY
Transparent watercolor is indeed that: transparent. The white you see in a transparent watercolor painting is the
 white of the paper that has been left unpainted. When you look at a white (or very light) spot on the painting, you are looking at the pure, 100% cotton watercolor paper's surface with little or no paint on it. In all cases, these areas were intentionally left unpainted. The watercolor artist needs to perceive his/her subject in both negative and positive at the same time, and must consciously paint around areas that are meant to remain white or light. Click on these two fur photos to enlarge for detail.
 NO WHITE PAINT
In purist transparent watercolor paintings, white paint is generally forbidden. In fact, there is no such thing as white transparent watercolor paint! White paint is by its very nature OPAQUE, not transparent; it covers up what's under it. But it also permanently changes the surface of the
Next page shows several client testimonials. . .
Go back to page 1 for prices.
CONTINUE THE CIRCLE TOUR: PAGE __ 1 __ 2 __ 3 __ 4 __ NEXT »
Go back to page 1 for prices.
CONTINUE THE CIRCLE TOUR: PAGE __ 1 __ 2 __ 3 __ 4 __ NEXT »
____________________________________________________________
Janet L. Wissmann, Watercolorist
Soldiers Grove, Wisconsin __ph. 608-624-5511 _9am-9pm Central Time Zone
____________________________________________________________
Soldiers Grove, Wisconsin __ph. 608-624-5511 _9am-9pm Central Time Zone
____________________________________________________________
